Stock Athearn Car
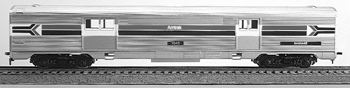
Some time ago I had purchased an Athearn streamlined baggage car in Amtrak's Phase III paint scheme, numbered 1167. Then, recently, I discovered a photo of the real 1167 in Phase IV paint at the Amtrak Photo Archive. I had known that the stock Athearn car did not match any Amtrak cars I'd ever seen, but I realized that with a few simple changes I could have a prototypical baggage car for my collection.
The first and most obvious difference I noticed was in the baggage doors. Whereas the Athearn car had two large rectangular windows in both doors, the Amtrak car had two square windows in the large door and only one in the small door. In addition, there was a Dutch door-style seam below the windows on both doors. I also noticed that while the real car had the same general fluting and upper letterboards as the model (unlike other series of Amtrak baggages), it lacked letterboards on the lower sides. The Athearn car has two on each side: a small one in the middle and a larger one at one end. These would have to be removed somehow. I'm sure the car would look just fine with the stock letterboards, but I decided to remove them, since I had a small triangular needle file that would be perfect for filing the side fluting. The last main difference I noticed was the lack of skirting on the lower side, since Amtrak removed the skirts from almost all of its Heritage cars. After studying my photo carefully, I also saw that the car had 41-CUDO outside-swinghanger trucks, which are rather different from the Athearn trucks. However, I think the stock trucks would look fine. I only made the change because I had a pair of the correct trucks on hand.
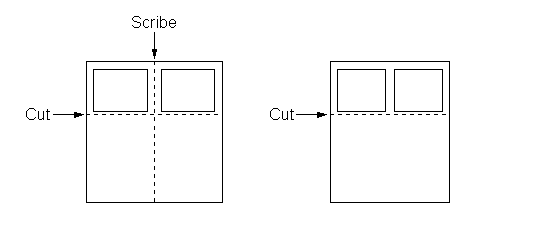
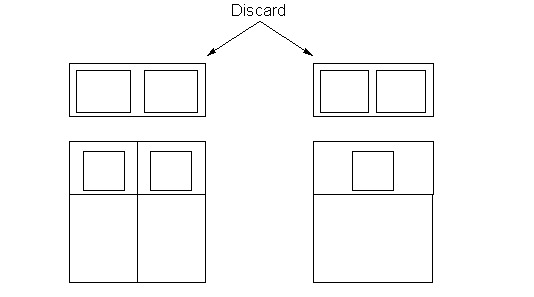
Start by disassembling the car if you've already had it in service. Otherwise, just take all the parts out of the box. Now scribe a cut line directly below the raised window frames on both doors. Also scribe a line down the middle of the larger door. See Fig. 1. Then scribe cut lines around the top portion of the doors, flush with the door frames. I went back and cut through with a sharp X-Acto knife until I had removed a rectangle of material from the door. It would also be possible to use a razor saw. Now use a small mill file to smooth the cut edges flush with the door frames, and take care to ensure that they are all straight. Using .040" styrene, make a replacement door top, cutting it to fit the opening. The windows are two scale-feet square. I sized this dimension to fit nicely in my replacement upper doors, but I think that it is a little oversize. However, I don't consider this a problem as the general proportions are correct. The window in the smaller door is centered, and the two windows in the larger door are centered on either side of the center line, which should be re-scribed onto the new piece. I made the windows by "twirling" out the four corners with the tip of the knife, then cutting the four sides. With this method I was able to give them slightly rounded corners. File the windows with a flat needle file until the sides are straight and square. Now cement the styrene door panels into place, flush with the surface of the door. There is no need to hide the line between them and the old door, as this joint represents the Dutch door on the prototypes.
The next step is an optional one. I chose to remove the lower side letterboards, but the model would look fine with them in place. I scribed lines on the letterboards to mark the center of each side flute covered by the board, then, using those lines as a guide, carved away the material with a triangular needle file to match the fluting. This process is difficult, and it's hard to tell if the flutes will turn out straight because of the black plastic. I gave the model a shot of silver paint every once in a while to see how it looked, but a light-colored primer woud also work. Be especially careful with the large letterboards - I messed up one but was able to restraighten the flutes somewhat so it's not as noticeable now. Again, this step is optional; if you're afraid of messing up the fluting, you can just leave it. I would actually recommend skipping this step, since it's very difficult to remove all traces of the letterboards. After I painted the car, I realized that if you look at it from a different angle, you can see where the letterboards were. Some other types of Amtrak baggage cars do have side letterboards, but I haven't seen many photos of those cars.
There is another optional step that I chose to omit: grab irons. If you want, shave off the cast-on grabs with a no. 17 chisel blade, then drill holes for new ones which should be formed from .015" or .020" brass wire. Secure them from the inside with a drop of CA. You can also install nut-bolt-washer castings at the ends of these grabs; or, if you're careful, preserve the cast-on ones. I simply left the cast-on grabs, mainly because I'd just broken a drill bit and was still frustrated over that. I also left the roof alone, but those strange round bumps that Athearn molds really ought to go. If you can figure out a way to carefully remove them and replicate the roof fluting, be my guest. The real car has some vents up there, so I just left the cast ones.
Now, before starting on the underbody work, prepare the body for painting. It would probably be a good idea to strip off the factory paint, but it's not necessary if the model came decorated for Amtrak. Wash it in warm, soapy water and then let it dry thoroughly. I use spray cans for simple work like silver and black Amtrak equipment. The color I used was called Bright Silver, made by Krylon. Other applicable generic colors would be stainless steel, silver, or chrome silver. Spray an even coat over the entire body, then set it aside to dry.
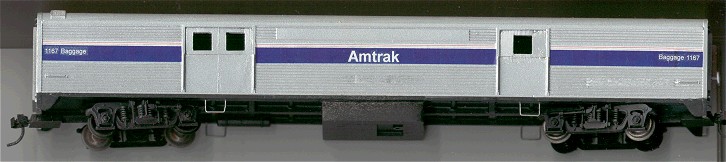
While the paint on the body is drying, let's turn to the underbody. The center skirts that are molded onto the floor casting must come off. It's not as hard as it seems if you do it right, and it will be easier once you get the hang of it. Use a razor saw to make a horizontal cut through the skirt, using the un-skirted area above the trucks as a guide. Try to keep it as straight as possible, and make sure you preserve the delicate lip at the top (basically leave about 1/16" of the skirt remaining, to match the truck wells). After you have made a cut of substantial depth, make a vertical cut to separate the skirts from the large box in the center of the floor. Again, use the exposed part of the box sides to guide your cut. Now the work will be mostly just deepening these saw cuts. Once you have separated the skirts, use a small mill file to smooth and square the cut edges. If you plan on leaving the large box in the center of the floor, cut and file the skirting off of it. The prototype does not have this box, but I thought it would be too difficult to remove. Now the small end skirts will need to be shortened by about half. This part is a little more difficult, since you will need to replicate the curved edge. Make a vertical saw cut about halfway along the skirt, and then a horizontal cut starting at the curved end. Now you should have a small, squarish piece of skirting. Use a small mill file to shape the inner end of this to match the curve of the original skirts. Then repeat the process on the remaining three. Compare the photo of my model with the stock model photo to understand this modification. I added a small air tank from my scrap box, following the prototype photo, but this was about as far as I went in terms of underbody detailing. I did form stirrup steps from some flat wire staples, loosely following the photo, but did not add them yet because I did not want to damage them while installing the trucks.
Now for the trucks. As mentioned before, you can use the stock trucks or replace them with Detail Associates or Train Station Products 41-CUDO outside-swinghanger trucks, which are the standard on Amtrak Heritage Fleet cars. Some modification is required to fit these trucks to the Athearn floor. Use a piece of Plastruct TB-4 tubing to fill in the large holes in the bolsters, and then drill and tap this for the long 2-56 screws that came with the kit. Assemble the trucks as per the instructions, then add the Athearn wheelsets once the cement is dry. Alternatively, replace the wheelsets with another manufacturer's 36" needlepoint metal wheelsets - the Athearn ones are not too free-rolling. Before you install the trucks, give the completed underbody a coat of flat back paint. Paint the small sections of skirting that remain as well. If you choose, you may paint the trucks also, but remove the wheels first, and try not to get too much paint on the back and in the bearing holes. Once the paint has dried, install the trucks with the Athearn kit's screws and washers. Use your choice of couplers, but be especially careful when cementing on the plastic coupler box lid if you are using plastic couplers and a solvent cement. Apply the cement sparingly along the edges of the lid.
By now, the body should be dry and ready to work on. I actually made my own decals, having purchased a secondhand Alps printer at the last minute - these wonderful printers can even print white, so it wasn't too hard to make the stripes and lettering. I had been preparing to use Microscale's 87-968 Amfleet Phase IV set for the stripes, and dry transfers for the lettering. I suggest using white Helvetica Bold size 16 for the large 'Amtrak' lettering, and size 6 or 7 for the smaller number and car type. If you use the Microscale stripes, I recommend you cut off about 1/16-3/32" from the bottom edge, judging by the prototype photo. Heritage Fleet Phase IV stripes are not quite as tall as the Amfleet stripes. Apply the decals using your favorite method, and finish with a clear protective coat.
If you choose, add diapragms to the car ends. Train Station Products makes tubular diaphragms, or you could make your own from plastic tubing. Add the wire stirrup steps below each baggage door, drilling up into the floor, and glaze the door windows with clear styrene. Use the original Athearn window inserts for the end doors. Install the sheet metal weights as per the Athearn instructions, and fit the floor and body together. Now your Amtrak consist has an up-to-date, reasonably accurate baggage car for the head end!