This website has been archived from TrainWeb.org/diez-mon to TrainWeb.US/diez-mon.
This website has been archived from TrainWeb.org/diez-mon to TrainWeb.US/diez-mon.
 After my successful SD45 project I moved on to
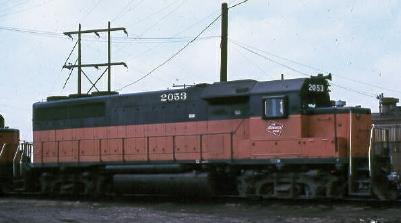
Milwaukee GP40 #2053. I started with an Atlas GP40 undecorated. My
modeling era is the early 1970's so the unit will not have the large "Milwaukee
Road" text on the long hood and nose. This was my second painting
and detailing project and it turned out very well.
First, I separated the model into it's components: shell, cab, handrails, and sill section. Thankfully, I didn't have to strip this model. I'm going to try to start with undecorated models in the future. I then went to work on removing all the cast on details with an exacto #11 and chisel blade. I removed all grab irons, lift rings, and coupler lift bars from the shell. Once these were removed I drilled all the holes for grabs, lift rings, and coupler bars using a #80 drill and pin vise. I used brass wire for grab irons and coupler lift bars. Gold Medal Models lift rings and windshield wipers were used as well. Time to paint! I again used PollyScale Engine Black and Milwaukee Road Orange. I prepared the shell by washing it lighty with dishsoap and warm water and I then dried it with a hairdryer. I painted the model with Milwaukee Road Orange first. I mixed
the paint about 80/20% with distilled water in a paint cup and used 35psi
to spray. I still find it preferable to apply several light coats,
rather than few thick coats. I then helped the drying along with a hair
dryer so I can immediately add my next color.
I used 3M masking tape, cut on a mirror so I'd have nice fine straight edges. I cut a tape strip the height of the orange and applied it all the way around using the bottom of the shell as a reference. On the nose the orange should just come to the top of the classification lights. I masked the shell first, then the cab to match, and finally the sill piece. I didn't have to paint the handrails as they came colored black. On this model I didn't spray a coat of orange after masking. I wish
I would've because I had some black leaking under the tape, not bad enough
to have to repaint though. I again mixed my paint 80/20% and applied
thin successive coats until I had a nice solid black. Painting the
orange first really helped here. The black covered easily and
I used a hair dryer to speed drying.
Time for details and decals. I created my brass wire grab irons and installed them using ACC from the inside of the shell. Lift rings, windshield wipers, and coupler bars were attached the same way. I then attached the snow plow using 5 minute epoxy. Once everything was dry I used a small brush to touch up the new details to match the body colors. I then used a very small brush to paint the step handrails flat white. I use a toothpick to color the step edges white. I used black and brown chalks to highlight the trucks and fuel tank. I think I will leave this model looking fairly new. I used my epoxy method to fill in the numberboards and they were ready to accept my numbers. I replaced the front LED in the unit with another white LED then made the small tube using aluminum foil to direct light to the headlight. I used my own Milwaukee Road decals created in Corel Draw 8.0 and printed with my ALPS MD1000 on Decal Paper from Tom Prestia at Tango Papa Decals. For the white unit numbers on the long hood I used Benn Coifman's RR Roman font. I used Solvaset to settle the decals down. When decals were applied and completely dry I sprayed the model with PollyScale flat clear finish to hide any decal edges. I prefer a flat finish to my models and PollyScale's look very good to me. Finally, I put the windows back into the cab and assembled the shell.
After I replaced the rapido couplers with Micro Trains #1015's my GP40
#2053 was ready to haul along with my SD45.
My second Milwaukee unit is finished!
|
 |
| Home | Pictures | Hobbies | Links | Contact me here.. |
|---|