DCC Decoder Installation for a K-Line Speeder
Stan Silverman
Sammamish, Washington
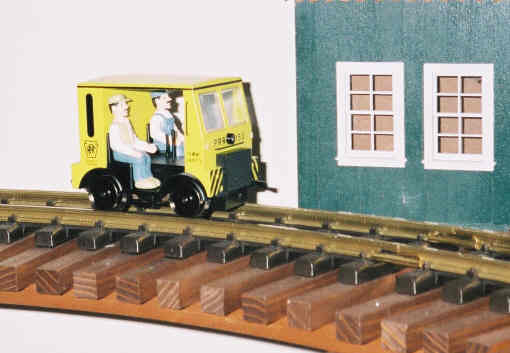
I really became enthused when I saw the little K-Line Speeder for
the first time. For an investment of only $37.95, how in the world
could I pass up this cute little fellow?
After having it scamper around my analog layout for a few days, I
decided that I would like to broaden its horizons. I would give it DCC
capability so that it could also run on my digital layout. This meant
that I had to figure somewhere to stash a decoder in the Speeder. Where
would I find the space in this diminutive device?
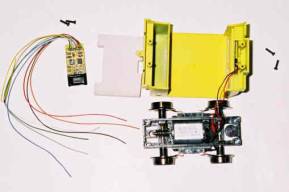
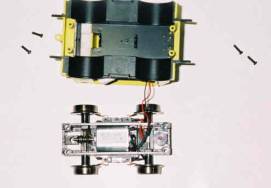 Removing
the screws in each corner is simple, and the body readily separates
from the motor block.
Removing
the screws in each corner is simple, and the body readily separates
from the motor block.
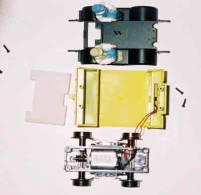
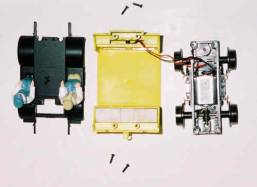 Further
examination showed that gently prying on the protruding bumpers would
quickly split the interior from the cab. What great luck! There's a
large white weight in the cab in the space behind the engineers that
looks large enough to house a decoder.
Further
examination showed that gently prying on the protruding bumpers would
quickly split the interior from the cab. What great luck! There's a
large white weight in the cab in the space behind the engineers that
looks large enough to house a decoder.
 The weight is
tightly pressed into place, and takes some coaxing to make it leave its
intended space. I pried at each side of the opening with a small
screwdriver to get the job done.
The weight is
tightly pressed into place, and takes some coaxing to make it leave its
intended space. I pried at each side of the opening with a small
screwdriver to get the job done.
Now it was time to find a decoder small enough to fit into the
available space and provide the needed functionality. An inexpensive
device is also sensible to complement the Speeder's low cost.
I purchased a Lenz LE103XF decoder locally for just under $18. It's
small, measuring about 1/2 inch wide and 11/2 inch long, and quite
thin. This decoder provides a full amp of current - far more than the
Speeder will ever need. It doesn't have a lot of functionality, but the
Speeder doesn't have a lot of bells and whistles. In fact, other then
the headlamp, it doesn't have anything to deal with.
A Digitrax decoder was available that was even smaller and slightly
less expensive. However I've had good experience with Lenz products in
the past. The Lenz warranty is superb: they'll replace the product at
no cost even if you're the cause of the problem! They once graciously
and quickly replaced a decoder that I stupidly fried during
installation.
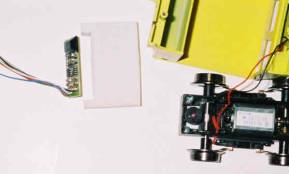
 Here's
what the decoder looks like in relationship to the Speeder. To make the
decoder feel at home in the Speeder, all we have to do is cut some of
the weight away and place the decoder into the opening at an angle.
Here's
what the decoder looks like in relationship to the Speeder. To make the
decoder feel at home in the Speeder, all we have to do is cut some of
the weight away and place the decoder into the opening at an angle.
 A hobby
saw made short work of enlarging the opening in the weight. Next, I
removed all decoder leads except those essential to the decoder
installation: red, black, orange and gray.
A hobby
saw made short work of enlarging the opening in the weight. Next, I
removed all decoder leads except those essential to the decoder
installation: red, black, orange and gray.
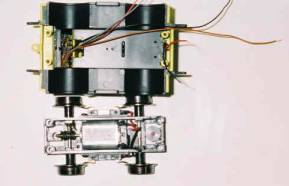 This is
what the decoder will look like tucked into the cavity in the weight.
Note that the headlamp leads have been cut. Before finalizing the
installation, insulate the edge of the motor block with tape to
eliminate possible shorts with the decoder's circuit board.
This is
what the decoder will look like tucked into the cavity in the weight.
Note that the headlamp leads have been cut. Before finalizing the
installation, insulate the edge of the motor block with tape to
eliminate possible shorts with the decoder's circuit board.
The first step in connecting a decoder is to electrically isolate
the motor from the track. The Speeder has wires running from the track
pickups directly to the motor as well as the headlamp. Cut these wires
near the motor, but leave enough wire to permit splicing to decoder
leads. Connect the decoder as follows:
| Decoder Wire |
Connects to |
| Red |
Red track pickup |
| Black |
Black track pickup |
| Orange |
Red motor terminal |
| Gray |
Black motor terminal |
The decoder wires should be cut as short as practical since there's
not a lot of room in the motor block for excess. Use heat shrink tubing
on all splices.
For simplicity, I decided to have the headlamp always on.
Alternatively, it could be connected to the decoder and controlled in
several different ways. For example: on in the forward direction, off
in reverse; bright in forward direction, dim in reverse. Since my
headlamp will always be on, I added a 220-ohm resistor in one of the
leads to reduce brightness and heat, and increase bulb life. The two
headlamp leads - one of them with the series resistor - are then
connected to the wires leading from the red and black track
pickups.
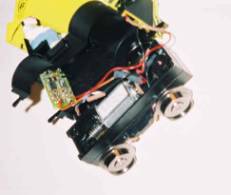 This
is what the wiring looks like just prior to final assembly. The
resistor leads can be seen at the top right, completely encased in heat
shrinkable tubing. Watch carefully to make sure all wires are within
the housing as you tighten the four mounting screws.
This
is what the wiring looks like just prior to final assembly. The
resistor leads can be seen at the top right, completely encased in heat
shrinkable tubing. Watch carefully to make sure all wires are within
the housing as you tighten the four mounting screws.
Now, enjoy your DCC-equipped Speeder!
Support this website by joining the Silver Rails TrainWeb Club for as little as $1 per month.
Click here for info.