Bachmann Freight Truck Tune up
[ Home ] [ Up ] [ Previous
Page ] [ Next
Page ]
Bachmann Truck Tune up
by George W. Schreyer
Bachmann rolling stock is very attractively priced, constructed
well and is usually well painted. However their trucks often
require a bit of a "tune-up" before they will run well. The work is
simple and requires little in the way of tools or materials.
- Remove the trucks.
- Regauge the wheel sets by gently twisting and pulling on the
wheels so that a gap of about 1/32" appears in the plastic axle.
Newer cars with metal wheels need regauging too. In this case, the
gap will between the axle and one of the wheels. You should secure
the wheel in its new position with a fillet of silicon sealer or
Crafter's GOOP. If you have a Kadee wheel gauge, use it to set the
gauge more precisely. Unless they are regauged, Bachmann wheel sets
will sometimes catch the open point rail of turnout when running
facing point.
- Spin each axle to be see that the wheels turn freely and that
the wheels are true. If a wheel set wobbles, discard it and get
another one.
- Sometimes the factory does not lubricate the axle bearings. If
there is no grease visible, add a very small amount of light oil
(LGB 50019 works real well) to each journal. If you run outdoors,
you might want to use graphite instead of oil as graphite tends to
collect less dirt however the wheels won't run as freely as with
oil.
- The coupler centering spring can sometimes rub on the center of
an axle. If this is the case, trim a little off the end of the
spring.
- MOST IMPORTANT STEP! Bachmann trucks are often
not properly aligned such that only three wheels actually rest on
the track. This misalignment guarantees derailments. I am guessing
that the packaging method causes the trucks to take a set during
shipment.
Place the DETACHED truck on a flat and level piece
of track and gently wobble the truck to be sure that all four
wheels are resting evenly on the track and that the truck frames
don't rock at all. If the truck needs adjustment, heat the
crossbeam for about 10 seconds with a 1200 watt hair dryer and
twist the truck firmly and hold it for a few seconds to set it back
into alignment. You may have to make several passes to get it
right. Trucks that are severely out of alignment may require
shimming of the side frames.
LGB fanatics should not be snickering at this point because LGB
trucks sometimes have the same problem and their stiffer
construction makes the trucks less capable of flexing back into
alignment under the weight of a car. Fully sprung trucks, such as
those from Aristo, are sufficiently flexible so that truck
misalignment is not a problem.
- While you at it, you should replace the Bachmann coupler with a
legitimate coupler as the Bachmann couplers just do not work very
well. Check out Coupler Tips for
more information on alternate couplers.
- You can optionally replace the plastic wheel sets with metal
ones. Metal wheels add weight and lower the center of gravity. They
roll better and don't leave that black gunk behind that fouls your
track. Any body's metal wheels work better than plastic wheels in
most applications. See The Large Scale
Wheel Tips Page for more information on alternate wheels.
- Shim the wheel sets with #6 by 1/32" nylon washers to reduce
the lateral play. The trucks will run more freely and the couplers
will align better. You can get suitable washers, p/n 90295A080,
from McMaster-Carr Supply
Co. for $2.10 for a bag of 100.
- Reinstall the trucks. Check to be sure that the trucks rotate
and rock freely on their pivots. On some trucks, the pivot hole
will need to be cleared of a ridge of excess plastic.
After this 10 minute tune-up, your Bachmann cars should run
smoothly and be derailment free.
Equalizing Bachmann Trucks
Jim Jackson posted instructions for "equalizing" Bachmann 2-4-2
tender trucks on the LSOL Product Review Workshop. It really does
work and the instructions are also valid for regular Bachmann
freight car trucks. The modifications allow the truck to flex
somewhat as if it was truly equalized so that the trucks can follow
really bad track without derailing. Actually, if you just follow
the instructions above to get all four wheels on the track, it'll
probably be good enough. However if you really want the trucks to
be tolerant of any track, the read on.
Jim used a file for most of his work. I was insufficiently
patient so I used a motor tool with a 1/8" cutter tool. This tool
can really strip off plastic in a hurry, so if you use a motor
tool, run it SLOW, no more than notch #2, or your
will melt the plastic as you mill.
Jim's instructions follow. The pictures are mine.
To equalize the truck, the idea is to get the truck bolster to
pivot between the side frames in the range of 10-12 degrees both
fore and aft. Most of the better sprung trucks on the market have
this highly desirable feature, which allows the truck to "flex" its
way through rough track variances. With about 15 minutes of filing
and fitting, the Bachmann Rigid Frame trucks can also be made to
flex.
The Bachmann truck bolster has a side plate that slips into a
socket cast into the back of the truck sideframe. All that's needed
is to remove enough plastic from mating parts to acquire the pivot.
This is what I did, all on a trial and error basis. Nothing really
critical about it, except one point as noted below. Here's what to
do.
- Disassemble the trucks.
- Put the bolster in a vise and with a cross cut file (less apt
to clog) file each side plate into an oval. ( ) Here's the critical
point. Do not reduce the WIDTH of the side plates for about 1/16"
across the center of the oval. This little "flat" keeps the bolster
from shifting back and forth in the socket. Also leave a "flat" at
the bottom of the bolster where the screw hole is.
- On the side frame, file down the socket about half way, until
the slot for the bolster end angle brace is almost gone. Test the
bolster in the socket as you go to make sure you have enough off of
both pieces to get the pivot.
- When you're satisfied with the fit between the bolster and
sideframe, convert the screw clearance hole in the bottom of the
sideframe to a slot so the that the side frame can still pivot when
the retaining screw is in place, I used a #42 drill as a mill to
cut the slot and opened it slightly with a file where needed to
clear the screw as it pivots.
- Upon reassembly, I put a #3 washer on the screw to keep it from
passing through the slot as things wear. Of course, keep the screw
loose enough to allow the bolster pivot action, yet snug enough to
keep out excessive play.
- To test your handiwork, tape a 3/16" high x 1/2" long piece of
wood along the railhead that will clear the flange, and roll the
truck over it with just enough hand pressure to keep it going. If
the wheel comes up onto the obstacle without causing any of the
remaining three wheels to lose contact with the rail, then you
"Done Good"!
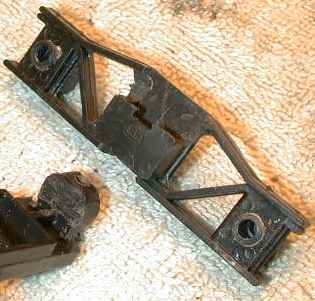
 This is
the job that I did one truck. Note that the pocket on the sideframe
needs to be milled down to the sideframe. Also, the oval part on
the bolster may be too thick on some trucks which will cause
binding instead of a nice pivot. I had to file down the thickness
of the side plate some to make it slip easily into the pocket and
pivot freely.
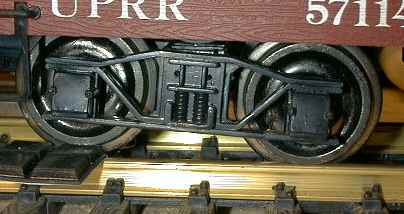
 I tried the
step test with a small piece of plastic under one wheel. The wheel
did indeed step over the obstacle while the other three wheels
stayed on the track.
[ Top ] [ Home ] [ Up ] [ Previous Page ] [ Next Page ]
30 Oct 1999.
© 1997-2000 George Schreyer
Created Dec 27, 1997
Last Updated Aug 13, 2000
Support this website by joining the Silver Rails TrainWeb Club for as little as $1 per month.
Click here for info.
 This is
the job that I did one truck. Note that the pocket on the sideframe
needs to be milled down to the sideframe. Also, the oval part on
the bolster may be too thick on some trucks which will cause
binding instead of a nice pivot. I had to file down the thickness
of the side plate some to make it slip easily into the pocket and
pivot freely.
 I tried the
step test with a small piece of plastic under one wheel. The wheel
did indeed step over the obstacle while the other three wheels
stayed on the track.