Building A Model Ore Bridge
by Ken Larsen
Anybody with even minimal styrene kitbashing experience can construct a model ore bridge - here's how to do it.
(Click
HERE
to view an
image of my model ore bridge
)
Guiding Assumptions
- Styrene is the primary building material, due to its ease of cutting/cementing, and wide availability of special shapes.
- This will be a static model, i.e., no operating tram or clamshell bucket. Styrene would sag and bend trying to support the weight of the motors necessary to power such a mechanism.
- We only want a plausible representation of a typical ore bridge, not an authentic rivet-by-rivet prototype reproduction.
Planning
Choose your favorite region. Is your model steel mill located alongside a Great Lakes harbor, such as Cleveland or Chicago? If so, your bridge will need a retractable extension to accommodate the arriving and departing ore freighters.
On the other hand, a bridge used on a river valley mill -- like those in Pittsburgh or Youngstown -- would be of a simpler design, since ore shipments arrive by rail or barge.
Obtain a set of Mike Rabbitt's Ore Bridge drawings before you start.
Anybody who has modeled steel mill structures knows about Mike Rabbitt's extensive library of drawings related to steel mill architecture and machinery.
His 1940's era blast furnace drawing set includes an ore bridge typical of those found in the Mon Valley; even if you plan to build a lake-side bridge, you can learn a lot of valuable technical information by studying Mike's ore bridge drawings closely.
Gather the necessary tools and materials.
Find a source for all of the EvergreenTM and PlastructTM styrene materials needed for your ore bridge.
You will probably need to have your long horizontal pieces special-ordered, since most hobby suppliers do not keep pieces longer than 14 inches on their shelves.
Click HERE to view lists of required tools and materials.
Common Prototype Characteristics
Regardless of region, all ore bridges share the following structural characteristics:
- Truss bridge - usually Pratt or Warren design, but other patterns occasionally used
- Supports: 1 set of fixed legs arranged in a triangular or pyramidal fashion, with a corresponding set of 'floating' shear legs, consisting of huge I-beams connected in an A-frame arrangement. NOTE: A common mistake of novice ore bridge modelers is to build a structure with these floating shear legs at both ends - faster and easier, but definitely NOT prototypical!
- Since the span is open across the bottom to accomodate the crane trolley, every ore bridge requires interior cross-bracing; these girders are usually configured in a 'W', 'X', or 'X-over-W' pattern.
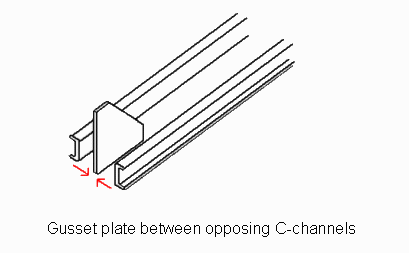
- Modern bridges have gusset plates 'sandwiched' between opposing pairs of C-channels (see diagram below). This method lends itself perfectly to model building, as you will see later in this article.
Photos of prototype ore bridges can be viewed at
http://trainweb.us/ironbelt/ore_bridge/prototype_photos.html
Divide-and-Conquer: A 3-Step Approach To Build the Span(s)
Looking at any prototype ore bridge - especially those at lakefront steel mills with extension spans - can be intimidating with all the criss-crossing lines of girders.
But in reality, a model ore bridge is much more straightforward to construct than a blast furnace, because there are no tapered surfaces; everything is a series of straight lines in multiple-recurring patterns.
The trick is to isolate these unique patterns so you can focus on them individually, via the following 3-step approach:
- Identify redundant patterns, then measure and cut component pieces accordingly
- Use a jig to ensure that structural members are spaced apart evenly on horizontal and vertical planes
- Build smaller subassemblies first, then join these together after cement has cured (i.e., don't RUSH it!)
The following sections are links to 'raw' images of PowerPoint slides shown at my modeling clinic for the Steel Mill Modelers Meet in Malvern, PA, on September 25, 2004.
Tunnel Frame Building Highlights (under const.)
Tram Building Highlights (under const.)
Starirway/Handrail Highlights (under const.)


