This website has been archived from TrainWeb.org/jfuhrtrain to TrainWeb.US/jfuhrtrain.
This website has been archived from TrainWeb.org/jfuhrtrain to TrainWeb.US/jfuhrtrain.
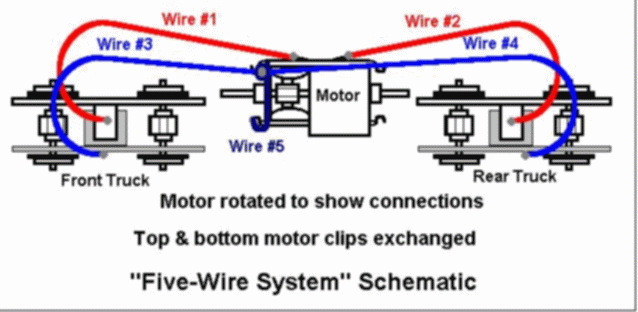
The drawing below shows the system as installed in any B-B locomotive. Similar installations also work for C-C locomotives, but some of the dash-2 styles have the motor reversed in relation to the power trucks. If you install the system in any locomotive and it runs backwards, simply re-install it with the front and rear trucks reversed, and wire #5 on the other side of the motor. The trucks also have to be swapped in this manner when Ernst gears are installed.
Note: when the right rail is positive, the locomotive should run forward.

To make the solder joints easily, tin all wire ends first. Then polish and tin all spots on the trucks where the wires are to be attached. (I use a hot 30-watt soldering iron.) Then touch the tinned spot, tinned wire end and soldering iron altogether to cause the tinning to flow together to complete the joint. The wire should be No. 22 or No. 24 stranded wire and should be dressed with extra length toward the pilot ends of each truck to maintain maximum flexibility. Always use rosin core electrical grade solder!
Wires #1 and #2 replace the stock steel strip. They are soldered
directly to the top tab of the power truck, and to the tabs on the top
motor clip (which was originally the bottom clip). Wires #3, #4 and #5
replace the frame as an electrical conductor. Wires #3 and #4 are soldered
to the side of the truck's metal sideframe, or in some cases to the bolster
tab, and arranged in such a way as to not interfere either with the free
motion of the truck, or with the wheels. They are joined by tinning
about 1/2 inch at the top end of wire #5, twisting the end to form a loop,
and crossing the ends of wires #3 and #4 in the loop before soldering all
three wires together. If the length of Wire #5 is adjusted properly,
no insulation is needed around that joint. The bottom of Wire #5 is soldered
to the front end of the bottom motor clip. Note also that when the
motor clips have been exchanged, there should be no impediment to the motor
seating in a level position in the motor mounts, reducing the possibility
of drag on the drive train caused by misalignment of the motor shaft with
the worm shafts. Just be careful not to lose any brushes or brush
springs when you exchange the motor clips.