Errata in Lineside
Ore Bridge Article
If you plan to build a fully-operating
model of the ore bridge described in Volume XIV of Lineside, the article contains some erroneous information.
1. Width of Main and Extension Spans Too Narrow
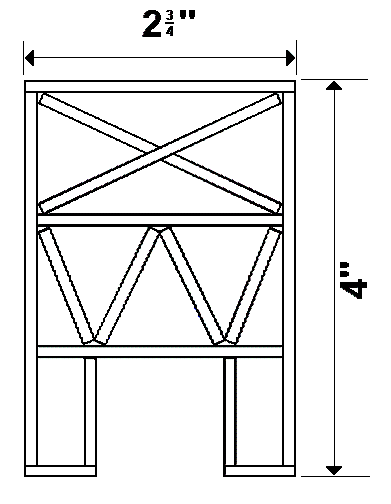
On page 20, the cross-brace frame diagram in Figure 3 shows
the width between the outside edges to be 21/4 inches. After the article went to press, I discovered that the narrowest
commercially available gearbox that could be placed in a matched pair (for the
two bucket control cable winches) is 13/8 inches wide, resulting in a total width of 2¾ inches when
placed side-by-side. A tram containing
this set of gearboxes will not clear the forward legs at the original width.
The center gap (where the railway is to be located) should
remain unchanged, but the bottom horizontal pieces of the U-shaped hanging
sections should each have 1/4 inch added to their lengths. Full-width horizontal beams need an
additional ½ inch; also, the diagonal pieces will need to be lengthened to
fit. (See the
amended Figure 3 below).
2. Attach Wire Connections to Rails Before Installing
If you wait until after you have constructed the rail frame
(as shown in Figs. 6-8) to solder the electrical wiring connections, you may
find yourself having to apply the solder to the inner sides of the rails.
Unless you are exceptionally talented with a soldering iron - which I am NOT -
the resulting globs of solder could potentially cause the tram to derail.
The strategy I should have followed is to solder
approximately 3 inches of wire to the outside of each rail at the forward (or
waterfront) end, then cover the ties with J-B Weld™ afterward.
-KJL 03/16/04


