


This website has been archived from TrainWeb.org/s-trains to TrainWeb.US/s-trains.
Saw Mill Lumber from: David_Horn@bestsoftware.comFrom: David_Horn@bestsoftware.com
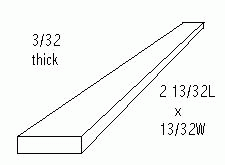
1) I found that 3/32" thick, 10.5mm wide, 73.75mm long boards work best. Ended
the evening with four 6-board loadings in a row without a misfeed.
 Graphic by Paul
2) basswood boards with broad faces sanded/polished with 2000 grit
sandpaper, I'll bet a hardwood works well too.
3) operate at 10 volts (using a 12B 250 watt transformer), higher works OK
with an occasional misfeed (crooked exit), and lower seems anemic.
4) noticed the same thing about the horizontal plate, vertical member, and
pusher-bellcrank below deck.
- gently twisted vertical plate below and above deck until got
reliable straight feed and return of top horizontal plate (pushes the boards
out)
- using lineman pliers bent vertical tab (below deck) forward
(holding upper section with pliers) until achieved proper throw of upper
horizontal plate - far enough that it pushes planks out, but doesn't cause
the pusher-bellcrank to bind.
5) Lightly roughed up the surface (400 grit) that boards rest on while
waiting to get pushed out - - helps relieve vibrating around while unit is
running and maintain alignment with pusher plate.
6) Make sure horizontal pusher plate is kicking back and its front edge goes
up when it recedes, and that its front edge is flat when pushing forward
against a board (watch it from the front without any boards loaded). This
ensures it stay behind boards when they're loaded in, yet doesn't clip the
next board in the stack on the way out.
Run it slow and observe actions from the top and bottom. Trial
and error
setting until satisfied.
I tested dozens five-board loads last night with pretty near bullet-proof
feeding and loading - - even the first one out which seems to be the
one to
most likely to mess up. Now to make more boards and test with
a full bay.
The secret to soldering from: "Alex Mendelsohn" <alexm@ispchannel.com>
The secret to soldering is to have enough heat at the point of contact
for
just the right time--and scrupulous preparation.
The latter means you should scrape, sand, or steelwool the surface to
be
soldered, and then clean it of all oils, residues, and
contaminants--including fingerprints. I use denatured alcohol for this,
after I make sure the surfaces to be joined are shiny.
Never carry the solder to the work on the soldering iron tip! Always
heat
the work and add the solder to the work at the same time. The use of
a good
resin-core solder such as Ersin Multicore or Kester 60/40 is essential.
The flux will cause the solder to "flow." Sometimes adding just a little
bit
of solder to the work or the iron's tip will also cause the flowing
effect.
Just don't over-do it. And, don't use acid fluxes where you won't be
able to
remove every trace later. They can cause nasty corrosion. However,
I use
paste flux quite a bit on larger items. I clean it off with denatured
or 99
percent isopropyl alcohol.
Also, use a wet sponge to keep the iron's tip clean. I clean the tip
by
swiping it on the sponge before EVERY joint is made. Then I add a miniscule
bit of solder to get the flux flowing and keep the tip "tinned." I
also use
steel tips, not copper. If you use copper, you can "dress" the tip
with a
file every now and then as needed. Do NOT file or dress a stainless
tip!
You'll ruin it, and they're expensive.
Sometimes, with larger peices, or items you're going to "sweat solder"
together, it pays to pre-coat the surfaces. This is called "tinning."
Just
prepare the pirces, and coat them with a thin solder "plating" before
joining them with extra solder. Oftentimes you'll tin a job before
putting
it into place with the other piece to be joined.
Sweating two pieces is nice because you don't see the soldered connection
or
joint. The two pieces are previously tinned and then placed together
and
then heated until the solder on the hidden surfaces flows toegther.
Also, once the solder is joining the work, be sure not to move the pieces
until the solder cools and sets. If you see a grainy effect, the soldered
connection is said to be a "cold" solder connection. Re-do it! Do not
cool a
joint with water either. Let it set or cool naturally.
You can use a "solder sucker" to remove excess solder or to de-solder
something, or try solder wick. Solder wick is a copper braid that sucks
up
solder, but it needs a little added flux-based solder to make it "start."
I
prefer a solder sucker, but they're much more costly. The solder sucker
is a
spring loaded affair with a trigger and a heat-resistant tip. You place
it
on the molten solder and hit the trigger and---bingo--the solder gets
sucked
into the tool, leaving a clena (and usually tinned) surface!
Regards and good luck, Alex in Kennebunk, Maine


