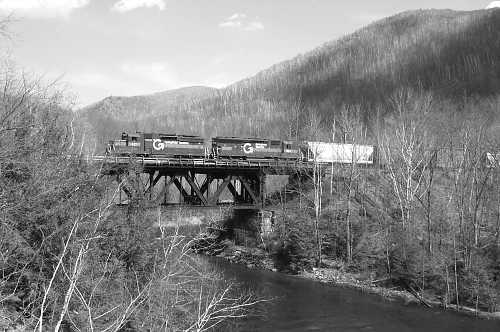
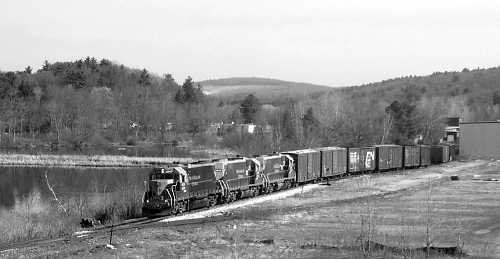
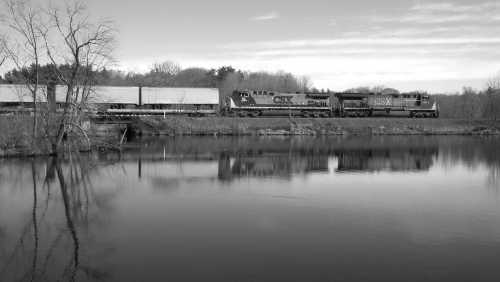
 Scenery
 Scenery
in tight spaces
Scenery
in tight spaces
We were asked to deliver this clinic by Larry Cannon who felt
that, while there were many ways make scenic effects appear larger when
modeling an urban area, it was very difficult to accomplish the same deceptions
with rural scenery. After viewing the prototype slides (made by Jim)
for this show, it occurred to me that the techniques were really the same.
A train ducking out from under a bridge does so anywhere, and isn't a great
stretch of one's imagination much to have track curve behind a hill instead
of a structure. Track must avoid both natural and manmade obstacles;
an arc always travels a longer distance between two points than a straight
line. Although tunnels may be more prevalent in large cities,
a number do exist in remote areas. 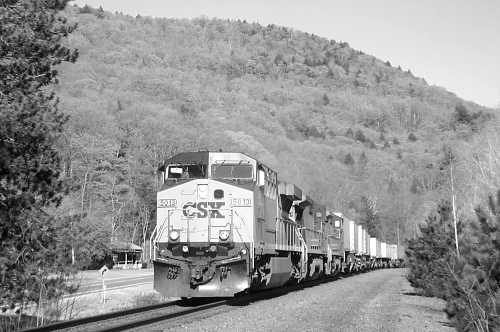
Roadways also disappear behind bridges and hills. Their sharp
curves consume little space and they can change elevation very rapidly
to present additional opportunities for bridge models. Waterways
can appear and disappear in much the same way. Background mountains
present much of the same vertical aspect of tall buildings and can have
as varied a skyline. Rock cuts and cliffs can be as much of a space
saver as an urban retaining wall. Although the hilly terrain most
of us choose is likely more suitable for scenic trickery, there is a surprising
amount of undulation even in the flatlands. Virtually all railroads
follow water and are built on a series of cuts and fills with frequent
bridges.
At least in the Northeast, it is difficult to find locations where a
whole train can be seen. Model trains are short, and it is helpful
to have them disappear and reappear within the scenery, much as if we were
pacing a full scale train. Nothing makes a layout appear smaller
than a long tangent track with the same scenic treatment throughout.
Make the terrain rise and fall both in front of and behind the track.
Make roads and water following the track appear and disappear as well.
Add a highway or waterway bridge. A long retaining wall may be built
with different materials and can include earth embankment and rock ledge.
. Foreground trees or detailed scenes can draw attention. The
more we can vary out scenic treatments and the longer we can occupy a visitor's
visual attention, the larger our small spaces will appear to be.
Considerations for scenery design
No model railroad is complete without detailed scenery. Otherwise,
your best efforts are no more than wood and track and wire to most
visitors. It's a safe assumption that many of your guests will
be non-hobbyists who could care less about how accurately this particular
expensive tiny brass object duplicates some fifty year old locomotive,
or how closely the operation of this miniature empire replicates a specific
day on the PD&Q Railway on groundhog Day in 1602. But they will
want to see your trains running around in a miniature representation of
the world. It's also a safe assumption that the majority of hobbyists
who come for a visit will really want to see the same thing, especially
if the occasion is an open house. It's only natural- everyone enjoys
looking at a beautiful model railroad, and a plywood prairie doesn't hold
anyone's interest for long, no matter how great the models are or how smooth
the trackwork is. Nor should we dismiss casual visitors- we all start
out as novices, and we were fortunate that some advanced hobbyist was kind
enough to show us his work and help get us started. We may not have
a legal or moral obligation to help newcomers, but doing so will make it
better for everyone. Ask any operations buff if train running improved
when scenery was added.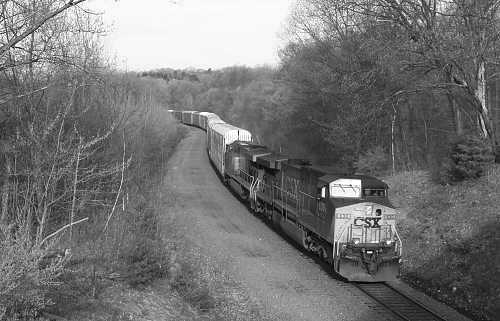
Although scenery building costs considerably less than any other phase
of layout construction, it's the most neglected part of layout construction.
Hobbyists who have no trouble charging into complex electronic or mechanical
projects they've no prior experience with are terrified of getting dirty
and being creative. A common answer is "But I'm not an artist!" This
may be true, but neither are most of the people who have built the beautiful
railroads you've been fortunate enough to enjoy. There is no denying
that formal training in the arts goes a long way to making scenery building
easier, but many people discover talents they never knew existed before
they attempted a scenery project. Materials, publications, and supplies
that are now available at hobby shops have turned the coloring and texturing
into straightforward techniques- with a little common sense and some observation
of the real world, a great deal of artistic talent isn't really a necessity
towards making attractive and realistic scenery. And remember
the the word "art" comes from "artifice"; we're not trying to duplicate
the world, just give an illusion that we are.
Scenic effects do take time. Probably scenicking a layout takes
more time than all the other construction steps put together. And
unlike the ready to run styrene products that now proliferate model railroads,
scenery must still be built from raw materials. But herein lies the
chance to be creative, to make your little world different from everyone
else's little world, to make at least some part of your layout built by
you. It's not necessary to plan out the scenery for an entire layout,
but a general idea of what will go where will help prevent false starts
and ripping out completed work. Many hobbyists start in one little
place without any idea of what will come next. The longest journey
starts with the first step, and ideas flow much more freely when you are
not looking at a blank canvas.
But you have to START- sitting around dreaming and planning and worrying
about making everything perfect and being certain that every contingency
is planned for really won't help all that much. There are as many
scenery techniques as there are model railroaders- books and magazines
will eventually describe most of them if you read long enough. But
just because you admire someone's work, it doesn't follow that you should
use their methods. I've tried many different techniques, and the
results always seem to come out about the same. But there are definitely
materials and methods I feel more comfortable with. Start with one
YOU feel comfortable with and soon you'll develop your own techniques.
Avoid formulas and recipes- you're better off selecting your own colors
and playing with the materials on your own. And don't let someone
else build your scenery for you. It may turn out "better" but by
doing so you're depriving yourself of one of the most rewarding achievements
that can be derived from building a model railroad. In a very real
sense it isn't "yours". If you really dislike what you've built,
remember that the materials are cheap and the time spent is leisure time.
But before you tear it out in disgust, look at it and try to figure out
WHY you don't like it and how you could do better the next time.
Everyone improves with practice so look on every effort as a learning experience.
I really didn't understand this when it was said to me as a college
freshman and perhaps you won't now, but "I wish you the joy of a difficult
search."
These essay were written as virtual handouts for NMRA Convention clinics.
"Tight Spaces" was first delivered at The Downeast Special for (NER
Spring 2002, Portland, ME) "Considerations" was prepared for Juniata
Junction (Tri-region Autumn 2000, Altoona, Pennsylvania) We
feel that the attitude and disciplines necessary for scenery building are
much more important than techniques which can be readily learned from books
or periodicals. In particular, we like the classic Kalmbach publication
"Scenery for Model Railroads" by Bill McClanahan since this describes many,
many methods for scenery building. Kalmbach also publishes Dave Frary's
scenery book, which shows his highly workable system which has become today's
standard text. Most scenery builders use some variation of at least
some of the techniques described in Dave's book. Tips also appear
in hobby magazines and on our web site. We have tried to address
what we feel is most important towards building attractive scenery, but
in the end, the hobbyist must bite the bullet and get messy and build scenery
if the plywood is to be covered. We welcome
your suggestions for additions and your techniques, both successful and
unsuccessful.
Mike Tylick
I found a product that makes a great thicket along the sides of roads
and tracks. It is called "Create-A-Craft" floral moss. It is made by FloraCraft,
Ludington, MI 49431 and is available in the craft department of Wal-Mart
stores. If I recall, the product sells for under two dollars and one bag
goes a long way. It is mostly green and brown with some tan mixed in. For
realism, it certainly beats ground foam or polyfiber.
FL
We visited Wal*Mart to check this out for ourselves and paind only
$1.47 for a bag of what looks like really nice scenery material.
Thanks Fred
Save those little plastic spice bottles when they're empty. I
wash them out good and then use them as shakers to dispense various colors
of ground foam. They're great on the workbench when you're
building a structure and want to scenic the base. They're small enough
to let you get in close to the structure and they dispense just the right
amount of foam with a few shakes. You can keep a wide variety of
colors handy in a small amount of space. I put labels on mine so
I know what brand/color to refill them with. RB
I read an article many years ago about preserving Lichen and now that
I have access to acres of the stuff, I can't find the article. The article
mentioned using glycerin and heating it for some amount of time. If anyone
remembers the article and can get me the recipe I would be greatly appreciative.
SMmillers@campbell-emh5.army.mil
Many thanks to SD for supplying us with the answer to this question.
The lichen articles in question appeared in RMC for September and October
of 1975. They were written by Dave Frary.
I often look for old furniture during spring cleanup...
the old horsehair stuffing makes great bushes with a different texture
than polyfiber. Also, I throw leftover weeds and lichen into a blender
and use the resulting chopped bits covered with foam to make rows of brush...
Winter is a great time to clip tips of lo-bush blueberry plants which make
great tree branches... DJ
A dried flower called Siberian Stattice is excellent for use as
tree armatures. It was available through Ben Franklin Crafts, a Maryland
and Pennsylvania chain. I would guess that just about any craft store
that carries dried flowers could order Siberian Stattice. As a matter of
fact, my store no longer stocks them so I place a special order. Ben Franklin
(as
well as other craftstores) also carries lots of art supplies such as matte
medium, latex molding rubber, and Amaco Sculptamold.
Be sure to order it in the natural color. It is
mostly brown to black in color,not the grayish brown of real trees, but
the natural color of the brown is almost too nice to paint. I've been making
great wooded areas with it. I usually get twenty or twenty-five trees out
of a bundle, depending on the size. Then I use spray adhesive and Woodland
Scenics foliage stretched out. There are other types of stattice
available, but only Siberian Stattice has the shape suitable for hardwoods.
FL
If you find that the plaaster you are using is setting too fast
for you to work with it, try adding a little vinegar to the water you are
mixing the plaster with. This should give you hours for rock carving.
CK
If you find that the plaster you are using is setting too slowly
for you to work with it, try adding a little plaster to the water you are
mixing the plaster with. This will make your rock molds cure quickly.
LH
I own and operate a Dental Laboratory and I have found that many of
the supplies and tools I use in my business are useful for my layout. Being
one who can't wait for things to dry or set up, when casting rock formations
out of plaster I use a slurry solution to speed up the set time of the
plaster. The slurry consists of water and plaster particles produced by
grinding up set plaster. When mixed with the plaster this slurry
solution will cause the plaster to set in seconds. This is definitely a
technique sensitive procedure. By the time the plaster and slurry are mixed
I need to be placing the castings immediately! This means I can mix, pour
and place castings at a fast pace and can produce mountains in a hurry.
RW - wied@integrityol.com
For those people living in areas that have "cattails" or "bullrushes"
you can use the tops for telephone poles or tree trunks. In the late fall
or early winter, collect the top sections when they are "fuzzy" - the tops
have matured fully. Using a knife blade, scrape off (do not cut off) the
fuzzy section. What is left is a naturally colored telephone pole with
the correct taper or a tree trunk. Because these cattails come in various
sizes, they can be used from N scale to S scale. BF
We wonder if you could use these for pine tree trunks as well.
Our favorite material for backfilling behind retaining walls, rock castings,
and structure foundations has always been a mixture of sawdust, white glue,
and water. We first learned of this idea from the Frary-Hayden scenery
articles in RMC years ago, although this tip does not appear in the Frary
scenery book. It's inexpensive, dries rock solid (although it can
be softened for tree planting with water sprays) and does not leave white
splatters on finished models and scenery. However, it can be difficult
to work at times and the sawdust chinks make it difficult to obtain really
smooth surfaces. CC of Riverside, CA suggests substituting clothes
drier lint for the sawdust where smooth surfaces are needed, such as for
road pavement. We seem to generate so much lint eery week that it
shouldn't take too long to obtain enough "pavement" for a superhighway
across our layout.
You can quickly scenic the layout if you have an electric carving
knife. The moving blades make short work of carving Styrofoam scenery without
kicking up a lot of plastic dust or melting the foam. The long blade makes
short work of carving even entire mountains. Be careful though- don't forget
its original purpose was to cut meat! SM, Southbridge, MA
I have always had problems adding glue to areas that require material
to be built up first, (eg. ballast on roadbed) or spraying an area that
has just been covered with a nice coat of fine foam only to have it ball
up in front of the spray). The cure? Tissue paper between track and road
bed or under other materials. One ply of T.P. placed on some wax paper,
sprayed with whatever undercoat color and allowed to dry. Lay tissue over
roadbed before laying track. Lay track and pour ballast making sure that
some tissue is exposed on sides of bed. When satisfied that ballast is
as wanted, simply squirt or pour thin glue onto tissue until it "wicks"
all the way into the center, (you can see the ballast wetting). I use a
syringe with a Zap-A-Gap tip) This works well on small areas of ground
cover also or anywhere spraying in a confined area is needed. This doesn't
work on large areas of thick foliage. MZ
MZ also wrote to ask about help on modeling rivers.
Kalmbach publishes two good scenery books, both called "Scenery Building"
or something like that which should show you all that you'd need. Check
the magazines too. Model Railroader in particular publishes project layouts
a few times a year and almost all of them include water. Rivers are actually
very easy. Although there are other methods, we build a flat surface for
the riverbed, but at the level you want the top to be. We then finish the
ground cover into the riverbed (many modelers paint sandy colored shallows
and feather this into a black bottom at center, which does work) Pouring
two part casting resin (available at craft stores) makes for a very nice
looking and simple job. It only takes a thin coat (maybe 1/4" at most)
to look very deep, so not too much of this expensive material is needed.
Be sure to make certain that the riverbed is completely watertight, as
the casting resin will seep into any crack or pinhole.
The old Blendor you've had knocking around since you got married can
also be of use. Try cutting up chunks of old foam rubber (the older, natural
foam works best- try getting scrap from a place that repairs auto seat
covers) into your own ground foam. Dried leaves can also be cut up, and
sifted to make an excellent late fall- early winter ground cover. Be sure
to add water to the mixture of either material to avoid burning out the
motor and dulling the blades. Dry the finished product on newspapers.
We bakers use... "PASTRY BAGS" to apply icing. They can also be used
to apply plaster. There are nozzles that can be placed in these bags to
give different extruding patterns. We refer to them as "TIPS" . Check them
out at baking supply stores (Look in Yellow Pages) System is ... cleaner
to work with. Speaking of plaster, I do not use it. I find I get better
results from using "Z -BRICK" cement. It comes in several colors and seems
to me to be ... more flexible. RPK
"MORTITE -NO-DRIP TAPE" (Stock no.NDT-30) is sold at large home improvement
stores for about $ 8.00 a roll and is a most useful product. I have used
it for roadbed and gravel roads. I add dark streaks, using diluted
flat black paint. I used it for a parking lot, next to an industry, dusted
it with some chalk to change the coloring. You could use it anywhere you
want to simulate gravel, but cover it with Dullcote or some other sealer
because this product is a little tacky. RPK
Don't throw out old rubber kickballs and beachballs when they're punctured.
Instead, cut them in half and use them as a plaster mixing vessel. The
spherical shape is perfect for mixing since there are no corners and when
you are done, allow the excess plaster to dry and merely flex the ball
inside out to dump the excess plaster into the trash. NEVER put plaster
down the sink or put dried chunks down the toilet. JW, Brookfield, Mass
For dirty country gravel roads I use ground up cigar ashes. That's right,
I'm an inveterate cigar smoker and I collect the ashes, grind them up a
bit and apply them as I would any other scenic material, with the standard
white glue/matte medium mix. The results are quite realistic. BF
We've also used cigarette ash made into a paste with water as a stain
for weathering wood. We no longer smoke, but it was the best method we've
yet encountered.
The best time to gather natural weeds for tree skeletons is late fall.
Bring home a wide variety of samples and try pulling them apart and removing
the seed pods. We're sure you will find something you like locally. We
do not go through the troubles of ganging weeds together into larger trees.
Mass forestry plantings make each individual weed look better than if it
were standing alone.
Don't forget to model the understory growth found in all forests. We
start with the smaller trees first and then add the larger ones. Any broken
branches that fall to the forest floor only add to the effect.
We find we use much less ground foam if we apply the foliage netting
on to the trees after they are attached to the layout. The more the foliage
is stretched out, the lacier and more realistic the tree will look. Stretch
the foliage netting over a newspaper to reclaim the leftover foam for use
as ground cover.
Although when building mountainous terrain I mostly use extruded Styrofoam,
I have discovered that a vast improvement over the plaster-soaked-paper-towels
method on screen wire or cardboard, is the use of coffee filters. They're
dirt cheap, easy to handle, and most importantly, don't tear when wet.
Regular size or huge commercial ones each have their applications.- MRC
A fellow from Florida sent a little story to us. A few people had built
some modules of the Everglades and they had put a few alligators into the
water. Now these guys didn't run out and find little Preiser castings in
the Walthers catalog. What they did was get some little chameleons and
embed them into the casting resin while it was still wet. I'm not sure
if they killed them first, threw them in alive, or poured resin over them,
but nevertheless they made excellent HO scale alligators. Anyway, they
brought the modules to a local show, and the animal rights activists went
nuts. The owners had to remove the modules from the show. We're not really
sure how we feel about this (except maybe to produce it in the theater
of the absurd) but it certainly is true that model railroading is fun.
We always attach foreground scenery in such a manner that if anything
is hit during an operating session, it will break away. It's much easier
to glue an object (telegraph pole, figure, vehicle) back in place than
to glue it back together. White glue is good for attaching these details,
since it will bond to non porous materials enough to hold them in place,
but not enough to attach them securely.
Vehicles are often left loose so they can be arranged for photographs
or for a change of scenery.
To attach figures and small details in place temporarily (such as for
photography) use Mini- Hold, which is available at miniature (doll house)
shops. Just rub the bottom of the casting on this wax like substance, and
it will stick temporarily to the scene. When removed, there will be no
damage or discoloration to the scenery.
For permanent attachment of styrene detail parts, we cut the head from
a pin (either straight or sequin, depending on the size of the piece),
hold the pin with a spring clothespin and heat the end of the pin with
a match. The heated metal will push easily into the styrene and stay put
when cool. While these pins make a firm attachment to any scenery base,
they are most effective for portable layouts with Styrofoam based scenery.
For use as backfill for structures or retaining walls (or for a general
scenery filler) we use a mixture of fine sawdust, white glue, and water.
This putty will apply easily and does not leave white marks or splashes
as all plaster products do. A crust will dry overnight, but the material
is easily worked for several days until it dries quite hard and strong.
It is impossible to drill into dried sawdust, but it can be reworked by
wetting the fill with water and leaving it for a half hour or so.
Back To M.O.W.

Division Office
| Yard Office
|
Roundhouse
|
Paint Shop
|
Workbench
| Interchange
Support this website by joining the Silver Rails TrainWeb Club for as little as $1 per month.
Click here for info.


